* Please note all costumes are from different sources and ideas and their authors were compiled using Pinterest.
Let’s be honest, Halloween costumes can be pricey considering what you get. They are usually made with cheap fabric, purchased in a plastic bag, and never guaranteed to fit perfectly. If you are after something unique and custom, that can get even more expensive! It seems like a lot of trouble to go to for just one day. These costumes are a great way for you and your children to craft together; to create a costume designed to suit them and go easy on your wallet!
Gumball Baby
(via Costume Works)
Purchase a soft cotton knit infant cap (found at a second hand store or online) and use a glue-gun to glue brightly colored pom-poms onto it. Try to find a red one-sy that has a turtleneck, so it gives the illusion of connecting the candy to the dispenser. Then, cutting felt into a square and a sharpie, create a $0.25 sign on the shirt and top off with black pants. There are some variations, like perhaps using a blue turtleneck instead of red or cutting out a felt $0.25 instead of drawing it on. It’s so adorable and can be used for infants and toddlers alike.
Cool Robot
(via Paging Fun Mums)
You will need:
a large cardboard box for the body, and a smaller one for the head (a standard shoebox would probably be the ideal size)
flexible ducts for the arms and legs (found at any hardware store)
tin foil
a box cutter
a glue gun
silver spray paint
silver face paint
2 empty 2 liter bottles
 Optional items:
used computer parts (you can find these at a local recycling center)
printed off pictures of fuel gages
Coat buttons
any other miscellaneous objects that you would like to spray paint silver and stick to the body or helmet of the robot.
Have fun with this! Cut out a large hole at the top of the main cardboard box for the head, two smaller on each side for arms, and the bottom side completely off – this hole will be used to get the child in and out of the costume easily. Spray paint the box silver, assemble it with various buttons – customize it however you like! Then add computer parts, a fuel gage, or buttons. You can also spray paint two (2) liter soda bottles and glue them upside-down to the back to create a jet pack! Measuring your child’s arms, glue-gun two flexible ducts to the arm-holes and adjust them accordingly.
For the helmet, a similar concept applies. Make sure the lid is secured to the shoebox and then cut a hole at the bottom wide enough for it to rest on the top of your child’s head. Add buttons and paint lids to the sides with a glue gun, and then spray paint the whole thing once the glue is dry. For the legs, cut two more flexible ducts according to your child’s leg length and slip them over their pants, which looks best if the pants are black. Cover their feet in tin foil, and viola!
Unicorn
(via Craftaholics Anonymous)
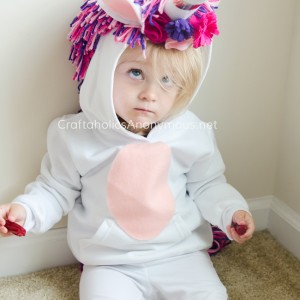 Does your little one love unicorns? This one is fairly simple and yet so cute!
You will need:
A white hoodie (a pullover; no zipper)
White leggings
Glue gun
Purple, light pink, and hot pink yarn
Purple, light pink, white, and hot pink felt
Packing or construction paper
Gold ribbon (optional)
Headpiece:
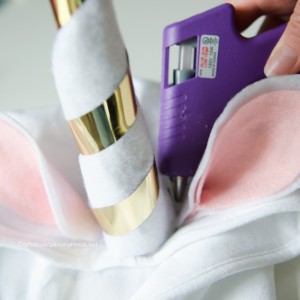
As you can see, the ears, mane, and horn are on top of the hood. To make the horn, roll a few pieces of construction paper into a horn shape (however long or wide you would like). From there, wrap a piece of white felt around it and secure it with a glue gun. Cut the bottom off so it is flat and can sit neatly on the head. For an added flair, wrap a gold ribbon around the horn and secure it as well. For the ears, cut two ovals with two pointed edges, using white felt to the desired ear size. Do the same with the light pink felt only a half-inch smaller. Glue the pink felt on top of the white felt and then pinch one side and glue them so that the pinched end can be inserted into the head piece (see image). For the felt flowers pictured, look up felt flowers on Pinterest as there are many different tutorials to choose from. Glue the ears on each side underneath the horn. Then along with the mane (described below) secure them to the front edge of the hood. Add the felt flowers as desired after this process.
Mane & Tail:
For the mane, take all three skeins of yarn and wrap them around the palm of your hand about 10 times. Then tie a single string around the middle to secure it tightly, and cut both ends – similar to how a yarn pom-pom is made. Continue making these over and over and tie them together until you reach desired mane length. The tail is made similarly, except the strands are much longer. Wrap these from the inside of your thumb to your elbow several times; however thick you want it to be. Then, similarly to the mane, take a single strand of yarn and tie it around the continuous loop, and then cut the opposite end of the loop so the strands dangle like a horse’s tail.
Torso:
Lastly, cut a large oval in the light pink felt to cover the torso on the front of the sweatshirt. Glue gun it to the front, but try not to cover the openings of either sides of the front pocket.
Scarecrow
(via Costume Works)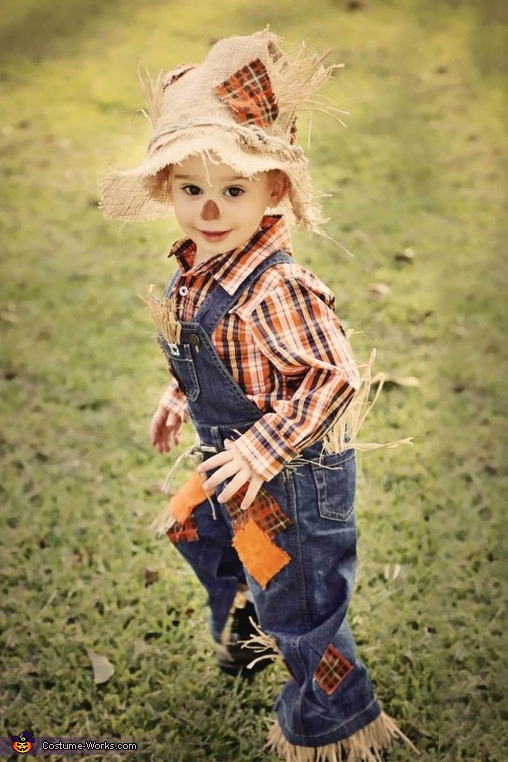
This one is a great gender-neutral option for a costume and one that also does not take a copious amount of time. You will need:
Brown shoes
A plaid shirt
Overalls
Raffia
Burlap
Patches to sew on if desired
Most of these items, if not all, can be located at a Goodwill or thrift store near you.
The hat may be the trickiest part; and because it is more complex and step-by-step, we have linked a separate tutorial here. Patches can be cut into squares from scraps, or unwanted plaid shirts and sewed on as desired. The raffia should be coming out of the pant legs and the tops of the overalls to give the illusion of the scarecrow being stuffed with hay. This can be created by simply cutting the raffia into 6-inch strips and sewing them to the inside hem of the pockets and pant legs of the overalls. Once your overalls are decorated as desired, take some brown lipstick, lip-liner or eyebrow pencil and draw in a cute little nose!
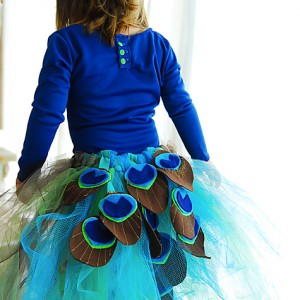
Peacock
(via Andrea’s Notebook)
Royal Blue Tulle Spool
Teal Tulle Spool
Lime Green Tulle Spool
Brown Tulle Spool
Brown, green, blue and navy felt. Or buy an assorted pack of felt.
3/4″ non-roll elastic for the waistband
Ribbon of any color coordinating with tutu. 1/2″ is best.
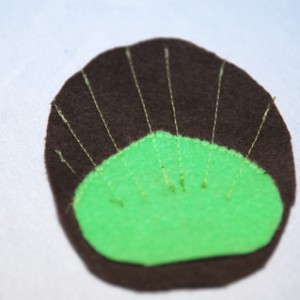
The eyes of the peacock feathers are probably the most complex part of this costume, but after this it is fairly simple. First use the felt you have in various colors and cut them to match this idea: One large brown oval, one lime green and teal chestnut-shaped piece (one being slightly smaller than the other), and a Pac-Man shaped navy piece.

Using light brown thread, sew lines protruding outward from the center. Sew only the green piece to the brown piece to do this. Then proceed to stack the others from biggest to smallest on top of each other with fabric glue. Create 4-6 more or as many as desired. Attach each peacock “eye” to the ribbons cut to different lengths. (This will provide variety and depth to the tutu.)
Before you attach them to the elastic, create the tutu next. Take your colorful strips of tulle and cut them into thick, long strips. Fold in half, and loop them around one side of the elastic (to go around the waist) and pull through – similar to a reef knot. You may do this, all around the elastic, or you may seclude it to the back to give that added peacock flared-out look. Andrea’s notebook used her darker tulle (the browns and dark blues and greens) on the outside edge of each side of the tutu, and reserved the brighter colors for the middle – probably to emphasize the feathers. When all the desired tulle has been attached to the elastic, then attach the felt peacock feathers by simply tying the ends of the ribbons to the elastic.
The tutu looks best with a royal blue shirt and black leggings. It’s so darling!